

こんにちは、 wand です!
今ご覧いただいているこのブログシステムは私が自分で構築したものです。
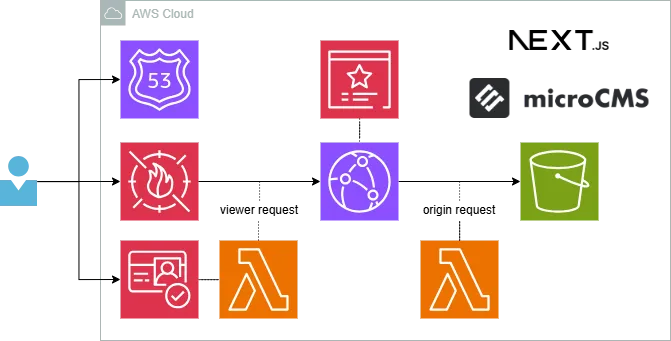 AWS + Next.js + microCMS で Jamstack ブログシステムを構築しましたAWS、Next.js、microCMSを活用した Jamstack ブログシステム構築の詳細
最近は技術的な改善を多数入れました:
- Next 15 / React 19 へのバージョンアップ
- ViewTransition の導入
- npm から pnpm への移行
- etc...
中でも、 Next 15 への移行では App Router 配下のページの params Prop が Promise になるなど、破壊的変更がありました。
- type Params = { slug: string }
+ type Params = Promise<{ slug: string }>
このような API 変更に対応する中で、同様のコード修正が複数発生し、今後も古い書き方をしてしまう可能性もあるため、ESLint カスタムルールで自動検出・警告できないかと考えました。
本記事では ESLint カスタムルールの環境構築からアプリケーションへの適用までをまとめます。
カスタムルール自体の実装については以下の記事でご紹介しています!
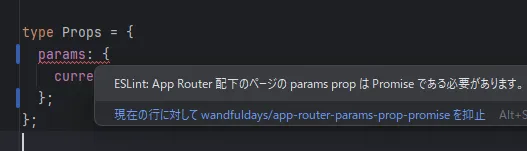 ESLint カスタムルール実装ガイド | esquery の力を活かす!ESLint カスタムルールの実装方法と具体例をご紹介。 esquery の強力なセレクタ表現でほぼ実装いらず!
ESLint Custom Rules 公式ドキュメント
本記事では、下記ドキュメントの内容をベースとして補足説明やノウハウの解説を行います。
環境
| ソフトウェア | バージョン |
|---|---|
| Windows | Windows 11 (24H2 OSビルド 26100.3775) |
| WSL | WSLg (Ubuntu 22.04 LTS) |
| WebStorm | 2025.1 Build #WS-251.23774.424 |
pnpm workspace を用いた monorepo 構成と設定
pnpm の workspace 機能を用いて、アプリケーションと ESLint カスタムルールを monorepo 構成で管理します。
infra/  # AWS インフラ (SAM)
  package.json
template/  # フロントエンド microCMS テンプレート
  package.json
packages/
  eslint-plugin/  # ESLint custom rule plugin
    package.json
.npmrc
package.json
pnpm-lock.yaml
pnpm-workspace.yaml
pnpm-workspace.yaml でワークスペースを定義します:
packages:
  - 'packages/*'
  - 'infra'
  - 'template'
これにより pnpm がどのパッケージをワークスペース管理対象とするかを認識できるようになります。
続いて、<project-root>/package.json でスクリプトを定義して、 pnpm frontend lint , pnpm eslint-plugin test のようにプロジェクトルートから各パッケージのスクリプトを実行できるようにします。
{
  "name": "blog",
  "version": "1.0.0",
  "description": "microCMS + Next.js (SSG) のブログシステムです。",
  "main": "index.js",
  "packageManager": "pnpm@10.10.0",
  "scripts": {
    "infra": "pnpm -F \"infra\"",
    "frontend": "pnpm -F \"nextjs-simple-blog-template\"",
    "eslint-plugin": "pnpm -F \"eslint-plugin-wandfuldays\""
  }
}
-F ( --filter ) オプションには対象パッケージの package.json の "name" フィールドに記載のパッケージ名を記述します。 (ディレクトリ名ではありません)
【WSL】 .npmrc で node-linker = hoisted を設定する
pnpm はデフォルトで入れ子になった依存関係をシンボリックリンクを使用してnode_modulesに配置します。
ワークスペースの packages/eslint-plugin パッケージを例とすると、その依存関係 ( eslint 等) は packages/eslint-plugin/node_modules/ にシンボリックリンクが作成され、<project-root>/node_modules/.pnpm/ の実体へ結びつけられます。
ls -l packages/eslint-plugin/node_modules/
合計 16
drwxr-xr-x 2 wand wand 4096  5月  8 15:25 @types
drwxr-xr-x 2 wand wand 4096  5月  8 15:25 @typescript-eslint
lrwxrwxrwx 1 wand wand   72  5月  8 15:25 eslint -> ../../../node_modules/.pnpm/eslint@9.26.0_jiti@2.4.2/node_modules/eslint
lrwxrwxrwx 1 wand wand   59  5月  8 15:25 mocha -> ../../../node_modules/.pnpm/mocha@11.2.2/node_modules/mocha
lrwxrwxrwx 1 wand wand   64  5月  8 15:25 prettier -> ../../../node_modules/.pnpm/prettier@3.5.3/node_modules/prettier
これにより、 package.json で依存関係が明示されているパッケージにのみアクセスできるようになっています。
{
  "name": "eslint-plugin-wandfuldays",
  "devDependencies": {
    "@types/eslint": "^9.6.1",
    "@types/estree": "^1.0.7",
    "@types/estree-jsx": "^1.0.5",
    "@typescript-eslint/parser": "^8.31.1",
    "@typescript-eslint/typescript-estree": "^8.31.1",
    "eslint": "^9.25.1",
    "mocha": "^11.1.0",
    "prettier": "^3.5.3"
  },
  "peerDependencies": {
    "eslint": "^9.25.1"
  }
}
しかし、筆者のように Windows 11 + WSL で開発を行う場合、Windows 側の IDE は WSL 上の Linux のシンボリックリンクを認識できないため、
eslint -> ../../../node_modules/.pnpm/eslint@9.26.0_jiti@2.4.2/node_modules/eslint
のシンボリックリンクは認識されず、 IDE の ESLint 連携が正しく動作しません。(もちろん、 prettier 等も同様です)
このような環境ではプロジェクトルートの .npmrc ファイルで node-linker = hoisted を設定し、シンボリックリンクを貼らないようにする必要があります。
node-linker = hoisted
こうすることで、 <project-root>/node_modules/eslint/bin/eslint.js のようにプロジェクトルートの node_modules/ に依存関係の実体が配置され、 Windows 側の IDE からも認識されるようになります。
ただし、この設定は pnpm の「依存の明示性」や「重複排除」の利点を一部損なうため、使用には注意が必要です。
ESLint カスタムルールのファイル構成と package.json 設定
下記の構成とします。
packages/
  eslint-plugin/  # ESLint custom rule plugin
    rules/  # ESLint カスタムルールの実装ファイルを配置
      *.js
    tests/  # ESLint カスタムルールの自動テストファイルを配置
      *.test.js
    index.js   # ESLint Plugin, 推奨設定を記述
    package.json
package.json の内容は下記のようになります:
{
  "private": true,
  "name": "eslint-plugin-wandfuldays",
  "version": "1.0.0",
  "main": "index.js",
  "exports": {
    ".": "./index.js"
  },
  "scripts": {
    "test": "mocha tests/**/*.test.js"
  },
  "devDependencies": {
    "@types/eslint": "^9.6.1",
    "@types/estree": "^1.0.7",
    "@types/estree-jsx": "^1.0.5",
    "@typescript-eslint/parser": "^8.31.1",
    "@typescript-eslint/typescript-estree": "^8.31.1",
    "eslint": "^9.25.1",
    "mocha": "^11.1.0",
    "prettier": "^3.5.3"
  },
  "peerDependencies": {
    "eslint": "^9.25.1"
  }
}
-
バッケージ名は
eslint-plugin-*という命名規約に則ると、アプリケーション側の eslint config をシンプルに書けるようになります。 -
JSDoc comment の
@typeアノテーションで型の恩恵を得るためにdevDependenciesで@types/*パッケージを入れています。 -
ESLint 付属の RuleTester はデフォルトでテスト結果が出力されず不便なので、 アサーションライブラリ兼テストランナーとして
mochaを入れています。-
Jest, Vitest 等のテストフレームワークでも良いですが、今回は以下の要件を満たすシンプルでミニマムな mocha を採用しました。
- glob でテストファイルを指定したい
describe,it,expect等の BDD スタイルのアサーション一式が揃っている
-
index.js ではプラグインの定義・推奨設定の定義を行います。
"use strict";

module.exports = {
  configs: {
    recommended: {
      plugins: ["wandfuldays"],  // package 名を eslint-plugin-* という規約に従って命名することで、ここをシンプルに書ける
      rules: {
        "wandfuldays/app-router-params-prop-promise": "error",
        "wandfuldays/no-redundant-template-literal": "error",
      },
    },
  },
  rules: {
    "app-router-params-prop-promise": require("./rules/app-router-params-prop-promise"),
    "no-redundant-template-literal": require("./rules/no-redundant-template-literal"),
  },
};
recommended という名前で推奨設定を用意しておきました。
こうすることで、アプリケーション側の ESLint 設定で個別にルールを列挙せずにすみ、運用上の管理がシンプルになります。
上記で参照している ESLint カスタムルール実装例は下記の記事のものです:
ESLint カスタムルール実装ガイド | esquery の力を活かす!ESLint カスタムルールの実装方法と具体例をご紹介。 esquery の強力なセレクタ表現でほぼ実装いらず!
ブログアプリケーションから ESLint カスタムルールを使用する
アプリケーション側では、まず ESLint カスタムルールのプラグインをインストールします。
pnpm frontend add -D eslint-plugin-wandfuldays@workspace:*
workspace:* というバージョンを指定することで、 npm 公式レジストリではなくワークスペースからインストールされます。
続いて、アプリケーションの eslint.config.mjs を下記のように設定します:
const compat = new FlatCompat({
  baseDirectory: import.meta.dirname,
});

const eslintConfig = [
  ...compat.extends('next/core-web-vitals', 'next/typescript', 'plugin:wandfuldays/recommended'),
  // ...
];

export default eslintConfig;
ESLint プラグインのパッケージ名を eslint-plugin-* という規約に従って命名したことで、 plugin:wandfuldays/recommended は eslint-plugin-wandfuldays プラグインの recommended コンフィグに解決されます。
動作確認
pnpm frontend lint
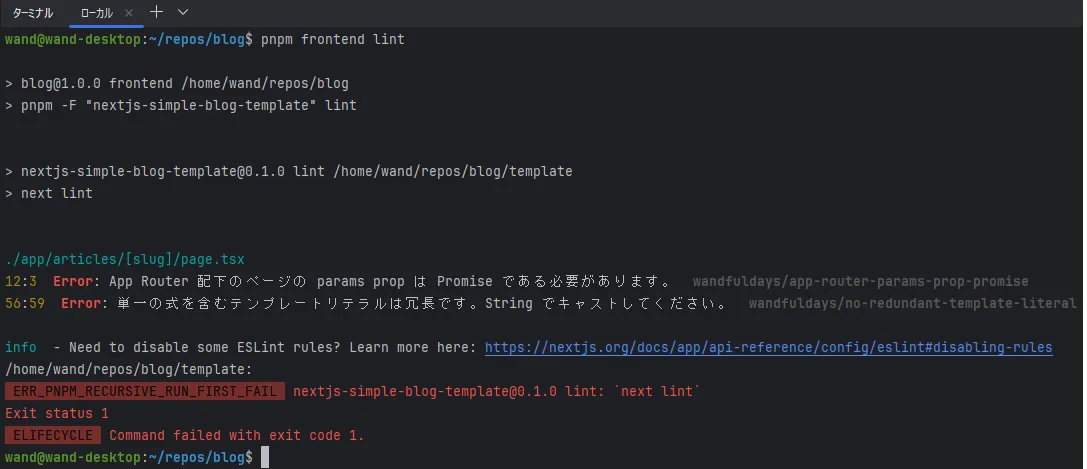
自作 ESLint カスタムルールで違反を検出できました!
まとめ
本記事では、pnpm の workspace を用いて monorepo を構成し、ESLint のカスタムルールを開発・適用する手順をご紹介しました。
ESLint のカスタムルールは、意外と手軽に作ることができ、一度導入すれば、継続的に開発生産性を底上げできます。
カスタムルールを社内で共有したり、OSS として公開することもできます!
「毎回同じような修正をしている…」
「レビューで似た指摘ばかりしている…」
そんなときは、静的解析による自動化 が有効です。
少しでも思い当たることがあれば、カスタムルール開発に挑戦してみてはいかがでしょうか。
日々の開発がもっと生産的になりますよ!