Next.js + microCMS 製ブログに Google AdSense 広告を実装する方法
2025-02-272025-03-10Next.js のページ遷移時の広告再表示と、microCMS の記事本文中への広告埋め込みについて解説します。
こんにちは、wand です!
このブログは Next.js と microCMS を用いて自作しました。開発の経緯や実装の詳細については、以下の記事で紹介しています。
今回は、収益化の一環として Google AdSense を導入しました!
しかし、Next.js + microCMS 製のブログでは、ページ遷移時の広告再表示や記事本文中への広告埋め込みに課題がありました。
本記事では、それらの解決策について詳しく解説します。
また、本ブログのソースコードは以下で公開していますので、参考にどうぞ。
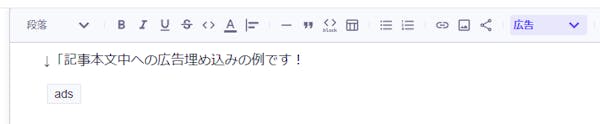
↓ 記事本文中への広告埋め込みの例です!
Next.js でのページ遷移時に広告を再表示する
Next.js の <Link> コンポーネントを用いたページ遷移は SPA 的な挙動をとるため、スクリプトがそのまま引き継がれます。
そのため、AdSense のスクリプトを単に貼り付けただけでは、広告が正常に再描画されません。
ページ遷移時に広告を正常に再描画するには、下記が必要です。
- 手動広告を使用すること
- ページ遷移時にスクリプトを再実行すること
残念ながら、自動広告を正常に再描画する方法はまだ確立できていません…
手動広告用の広告ユニットを作成
まず、AdSense のダッシュボードで 「広告」>「広告ユニットごと」 から新しい広告ユニットを作成します。
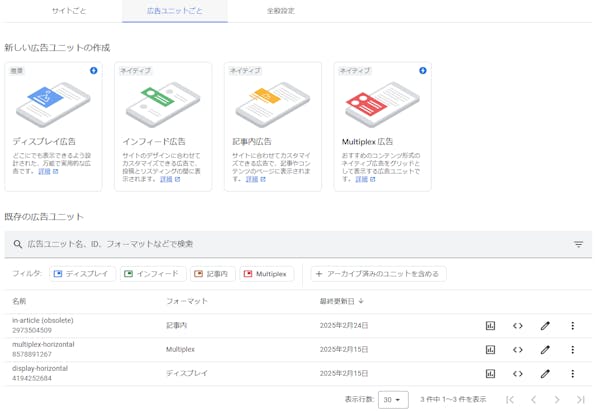
作成後、以下のような広告ユニットのコードが生成されます。
<script async src="https://pagead2.googlesyndication.com/pagead/js/adsbygoogle.js?client=..."
     crossorigin="anonymous"></script>
<ins class="adsbygoogle"
     style="display:block"
     data-ad-format="autorelaxed"
     data-ad-client="..."
     data-ad-slot="..."></ins>
<script>
     (adsbygoogle = window.adsbygoogle || []).push({});
</script>このコードのうち、次のスクリプトは自動広告でも共通で使用され、初回ロード時に1回だけ実行すればよい ものです。
<script async src="https://pagead2.googlesyndication.com/pagead/js/adsbygoogle.js?client=..."
     crossorigin="anonymous"></script>
一方、以下のコードは 画面遷移のたびに実行する必要があります。
<ins class="adsbygoogle"
style="display:block"
data-ad-format="autorelaxed"
data-ad-client="..."
data-ad-slot="..."></ins>
<script>
(adsbygoogle = window.adsbygoogle || []).push({});
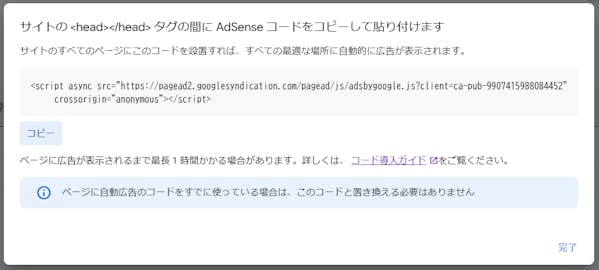
</script>RootLayout に Google AdSense 共通スクリプトを配置
<script async src="https://pagead2.googlesyndication.com/pagead/js/adsbygoogle.js?client=..."
     crossorigin="anonymous"></script>
このスクリプトは、Next.js の RootLayout に配置します。
import Script from 'next/script';

export default async function RootLayout({ children }: Props) {
  return (
    <html lang="ja">
      <body>
        {!!process.env.GOOGLE_ADSENSE_PUBLISHER_ID && (
          <Script
            async
            src={`https://pagead2.googlesyndication.com/pagead/js/adsbygoogle.js?client=ca-${process.env.GOOGLE_ADSENSE_PUBLISHER_ID}`}
            crossOrigin="anonymous"
            // NOTE: 公式は head 内にいれることを推奨している。
            // beforeInteractive とすることで実現できるが、そうすると Google PageSpeed Insights のスコアが著しく悪くなる
            strategy="afterInteractive"
          />
        )}
  // ...
なお、このスクリプトは自動広告でも兼用であり、 <head> 内に配置することが推奨されています。
これは Next.js の <Script> コンポーネントで strategy="beforeInteractive" を指定することで可能ですが、ページのインタラクティブ化が遅延し、Google PageSpeed Insights のスコアが大幅に低下 します。
そのため、パフォーマンスを考慮し strategy="afterInteractive" を指定し、<body> 内に配置する 方針としました。
広告コンポーネントの実装
広告を表示するためのコンポーネントを作成し、ページ遷移時に広告が正しく再描画されるようにします。
<ins class="adsbygoogle"
     style="display:block"
     data-ad-format="autorelaxed"
     data-ad-client="..."
     data-ad-slot="..."></ins>
<script>
     (adsbygoogle = window.adsbygoogle || []).push({});
</script>
この広告スクリプトを汎用コンポーネントとして実装し、広告ユニットごとの設定を柔軟に指定できるようにします。
'use client';

import { useLayoutEffect } from 'react';

type Props = {
  className?: string;
  googleAdsensePublisherId: string;
  adSlot: string;
  adLayout?: string;
  adFormat?: string;
  fullWidthResponsive?: boolean;
};

export default function AdSenseIns({
  className = '',
  googleAdsensePublisherId,
  adSlot,
  adFormat,
  adLayout,
  fullWidthResponsive,
}: Props) {
  useLayoutEffect(() => {
    (window.adsbygoogle = window.adsbygoogle ?? []).push({});
  }, []);

  return (
    <ins
      className={`adsbygoogle ${className}`}
      data-ad-client={`ca-${googleAdsensePublisherId}`}
      data-ad-slot={adSlot}
      data-ad-format={adFormat}
      data-ad-layout={adLayout}
      data-full-width-responsive={`${fullWidthResponsive}`}
    />
  );
}
さらに、特定の広告ユニットを表示するコンポーネントでラップします。
'use client';

import { usePathname } from 'next/navigation';
import AdSenseIns from '@/components/adsense/AdSenseIns';

type Props = {
  googleAdsensePublisherId: string;
  adSlot: string;
};

export default function MultiplexHorizontal({ googleAdsensePublisherId, adSlot }: Props) {
  const pathname = usePathname();

  return (
    <AdSenseIns
      key={pathname}
      className="block"
      googleAdsensePublisherId={googleAdsensePublisherId}
      adSlot={adSlot}
      adFormat="autorelaxed"
    />
  );
}
ここで key={pathname} を指定しているのがポイントです。
React の仮想 DOM では、同じ key を持つ要素は同一とみなされ、異なる key なら別の要素として扱われます。そのため、ページ遷移時に pathname が変わることで key も変化し、 <AdSenseIns> コンポーネントが アンマウント・再マウント されます。
この仕組みにより、
- 遷移元ページの広告は削除される
- 遷移先ページでは新しい
<ins>タグに対してuseLayoutEffectが実行され、広告が再表示される
という流れが実現できます。
microCMS の本文中に広告を埋め込む
↑のような広告です。
React.js では createPortal を使用することで通常のコンポーネントツリーとは異なる位置に要素をレンダリングできます。
この仕組みを利用し、microCMS の記事本文内に広告コンポーネントを挿入し、記事内広告を実装してみます。
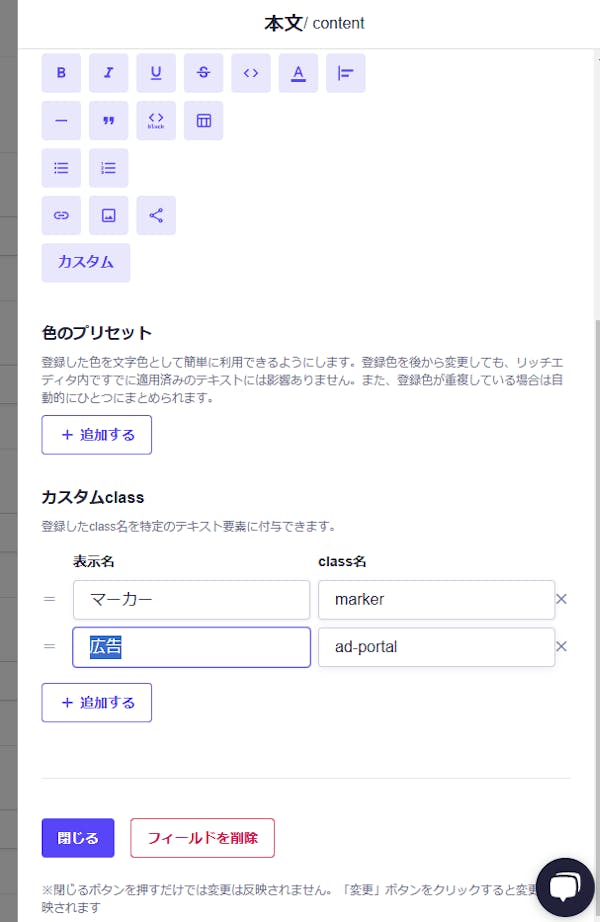
microCMS のリッチテキストで ad-portal クラスを定義
記事本文(リッチテキスト)内に広告コンポーネントを Portal で埋め込むには、挿入先の要素とその目印が必要です。
今回は、microCMS のリッチテキストの「カスタム class」機能を利用します。
- microCMS の管理画面で設定
- 「API 設定」>「API スキーマ」から本文フィールドの設定を開く。
- 「カスタム class」を定義し、
ad-portalという class 名を設定する。
ad-portal クラスを用いて広告位置を指定
記事本文の任意の位置に、 ad-portal クラスを適用した文字列を記述します。内容は任意ですが、1文字以上必要です。
Portal として使用するには innerText は不要ですので、 SSG(Static Site Generation)のタイミングで削除しておきます。
import cheerio from 'cheerio';

export const formatRichText = async (richText: string) => {
  const $ = cheerio.load(richText);

  // 他の加工処理...

  // 広告掲載ポータルの中のダミー文字列を消し込む
  $('.ad-portal').text('');

  return $.html();
};
.ad-portal に Portal で広告をレンダリング
.ad-portal の位置に広告を埋め込むコンポーネントを実装します。
'use client';

import { useLayoutEffect, useState } from 'react';
import { usePathname } from 'next/navigation';
import { createPortal } from 'react-dom';
import DisplayHorizontal from '@/components/adsense/DisplayHorizontal';

type Props = {
  googleAdsensePublisherId: string;
  adSlot: string;
};

/**
 * 記事に広告をポータルで埋め込むコンポーネント
 */
export default function InArticleAdsPortal(props: Props) {
  const pathname = usePathname();

  return <InArticleAdsPortalImpl key={pathname} {...props} />;
}

function InArticleAdsPortalImpl({ googleAdsensePublisherId, adSlot }: Props) {
  const [adPortals, setAdPortals] = useState<Element[]>([]);

  useLayoutEffect(() => {
    setAdPortals(Array.from(document.querySelectorAll('.ad-portal')));
  }, []);

  return (
    <>
      {adPortals.map((adPortal, index) =>
        createPortal(
          <DisplayHorizontal googleAdsensePublisherId={googleAdsensePublisherId} adSlot={adSlot} />,
          adPortal,
          `ad-portal-${index}`,
        ),
      )}
    </>
  );
}
実装のポイントは以下です:
.ad-portalの要素は複数存在する可能性があるため、配列のステートadPortalsで管理する。.ad-portalの要素は React の仮想 DOM の管理外の要素なので、副作用としてuseLayoutEffectでadPortalsステートを更新する。- ページ遷移時に
adPortalsステートをリセットするため、keyにpathnameを指定する。
上記の InArticleAdsPortal を記事コンポーネント内に配置することで、記事内広告を実現します。
export default function Article({
  formattedContent: content,
  googleAdsensePublisherId,
  adSlotDisplayHorizontal,
}: Props) {
  return (
    <main data-pagefind-body>
      ...
      <ArticleContent dangerouslySetInnerHTML={{ __html: content }} />
      ...
      {!!googleAdsensePublisherId && !!adSlotDisplayHorizontal && (
        <InArticleAdsPortal
          googleAdsensePublisherId={googleAdsensePublisherId}
          adSlot={adSlotDisplayHorizontal}
        />
      )}
    </main>
  );
}
まとめ
本記事では、Next.js + microCMS 製ブログに Google AdSense を導入し、下記を解説しました。
- ページ遷移時に広告を正しく再描画する方法
- microCMS の本文中に広告を埋め込む方法
この記事が、Next.js + microCMS を活用したブログ運営の参考になれば幸いです!

wand
「wand」は魔法の杖を意味します。魔法のようにさまざまなものを自分の手で生み出せるようになりたい、そんな思いを込めました。 ハンドメイド、家庭菜園、DIY、プログラミング等、「つくる」をテーマに色々なことをしていきたいと思っています。 Amazonのアソシエイトとして、wand は適格販売により収入を得ています。 GitHub: https://github.com/wand2016